Tag Archives: UBuntu 18.04

Encryption with eCryptfs on Linux

Introduction

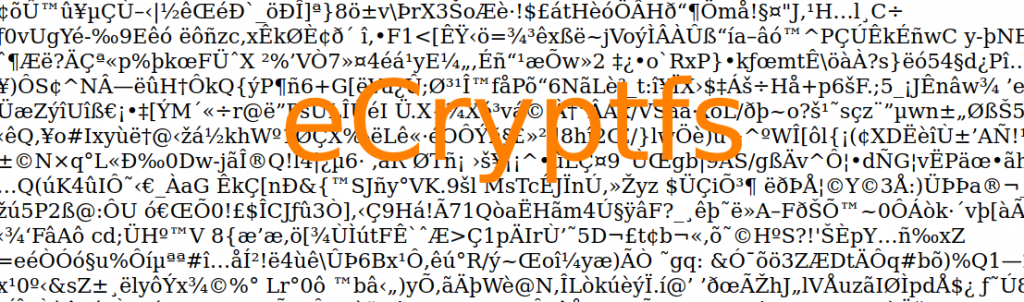
eCryptfs is a POSIX-compliant enterprise cryptographic "stacked" filesystem for Linux. Please note that eCryptfs is not a partition/ disk encryption subsystem like "Veracrypt".

eCryptfs is a stacked filesystem that can be mounted on any directory and on top of the main file system.

Using eCryptfs, we can easily create an encrypted directory to store confidential data and mount it on any directory. Although it is good practice for the mount path to match the path of the underlying file system.

No separate partition or pre-allocated space is actually required. eCryptfs should work well on local filesystems such as EXT3, EXT4, XFS, JFS and ReiserFS etc.

eCryptfs also supports networked filesystems such as NFS, CIFS, Samba and WebDAV, but not does not have full functionality as it was designed to work with local filesystems.

It stores the cryptographic metadata in the headers of files, so the encrypted data can be easily moved between different users and even systems. eCryptfs has been included in Linux Kernel since version 2.6.19.

Installation

I have only tested it on Ubuntu 18.04 which runs on the 5.4.0-87-generic kernel obtained by running

$ uname -r

5.4.0-87-generic

To enable an utilize Ecryptfs install ecryptfs-utils

$ sudo apt install ecryptfs-utils

How to use Ecryptfs

The method below explains how to encrypt a folder called temp2 located at /home/zephyr/temp2

Open terminal and run the following:

$ sudo mount -t ecryptfs /home/zephyr/temp2 /home/zephyr/temp2

Passphrase: ↠enter your passphrase

Select cipher:

1) aes: blocksize = 16; min keysize = 16; max keysize = 32

2) blowfish: blocksize = 8; min keysize = 16; max keysize = 56

3) des3_ede: blocksize = 8; min keysize = 24; max keysize = 24

4) twofish: blocksize = 16; min keysize = 16; max keysize = 32

5) cast6: blocksize = 16; min keysize = 16; max keysize = 32

6) cast5: blocksize = 8; min keysize = 5; max keysize = 16

Selection [aes]: 1 ↠selected

Select key bytes:

1) 16

2) 32

3) 24

Selection [16]: 1 ↠selected

Enable plaintext passthrough (y/n) [n]: n ↠selected

Enable filename encryption (y/n) [n]: n ↠selected

Attempting to mount with the following options:

ecryptfs_unlink_sigs

ecryptfs_key_bytes=16

ecryptfs_cipher=aes

ecryptfs_sig=015fa84ce5a1043d

Mounted eCryptfs

temp2 is now and encrypted folder. Any files and folders moved into it or created in it, will be automatically encrypted.

It is very important to remember your passphrase to be able to access your eCryptfs encrypted files and folders. It is also advisable to make note of your encryption settings for future mounting/access of your encrypted file/directory. Choose a password of 14 characters long made up of 3 random words. This is easier to remember and still secure. You can add symbols and numbers to it increase the strength of the passphrase.

A signature file named "sig-cache.txt" will be created under "/root/.ecryptfs/" directory. This file is used to identify the mount passphrase in the kernel keyring. It is a read only file except for the root user. I suggest saving a copy with a .bak extension as the signature number for each encrypted and mounted folder. It is a good reference to have.

Accessing your encrypted data.

Each time you reboot your system the encrypted volume will be dismounted and you will not be able to access your encrypted data.

To access your data you have to remount the encrypted volume with:

$ sudo mount -t ecryptfs /home/zephyr/temp2 /home/zephyr/temp2

After which Terminal pops up prompting you for your passphrase

passphrase to be entered in Gnome Terminal to access folders(files/ encrypted with ecryprtfs. Zephyr Rodrigues, Belmonte, Luz de Tavira, Portugal
type in your passphrase

The problem with this is that you have to enter all the encryption options each time.

Automating the mount process

My solution to this is make an executable .sh file with a text editor. I use the default, gnome, gedit text editor

In this example, I have called it mount_temp2.sh

Paste the following code into it. Use whatever options you chose when you encrypted the file/folder.

#!/bin/bash $ sudo mount -t ecryptfs -o ecryptfs_cipher=aes,ecryptfs_key_bytes=16,ecryptfs_passthrough=no,ecryptfs_enable_filename_crypto=no /home/zephyr/temp2 /home/zephyr/temp2

Save mount_temp2.sh

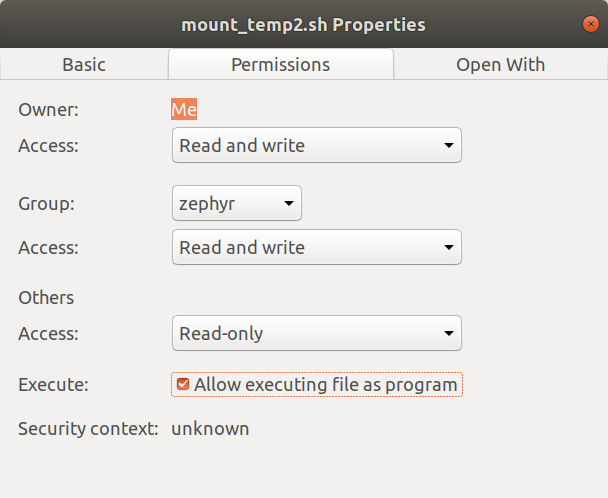
Right click, on the file in File Manager, go to the Permissions tab and tick the box “Allow executing file as a programâ€

Ubuntu 18.04, File Manager, Make executable, Zephyr Rodrigues, Belmonte, Luz de Tavira, Algarve , Portugal

Next with your Text Editor, create a new executable file.
Call it run_mount_temp2.sh for example.
Paste the following code into it.

#!/bin/bash #start terminal and mount encrypted temp2 folder gnome- terminal -- sh -c './mount_temp2.sh'

Make it executable as described previously. Now when you start your system, simply double click on

run_mount_temp2.sh

this it will call Terminal and prompt you to enter your passphrase. After entering the correct passphrase you will be granted full access to your encrypted folder and files within.

Automating the dismount process

You can dismount (unmount) your encrypted folder at any time to make it inaccessible. By default

to unmount an encrypted drive manually, open Terminal an run

sudo umount /path/to encrypted/folder

so, in my test case it is

sudo umount /home/zephyr/temp2

To Automate unmount/dismount:

Create an executable file (refer to ‘Automating the mount process’ for the steps) called

unmount_temp2.sh and in it enter the following code. Paths and folders should match your own.

#!/bin/bash sudo umount /home/zephyr/Documents echo "Dismounting Documents folder.."; sleep 5;

Next create the run file that will open Terminal and run the previous created executable.

Create an executable file called run_unmount_temp2.sh

Enter the following code into it:

#!/bin/bash #start terminal and unmount encrypted temp2 folder gnome-terminal -- sh -c './unmount_temp2.sh'

Double clicking on run_unmount_temp2.sh will run Terminal and execute the command to unmount the encrypted folder

Notes on Automation

All the automation files should be in the same folder/directory

The folder/directory containing the automation files should not be encrypted.

Creating an encrypted folder on a USB drive

On your Linux machine format a USB stick with ext4 file system. The USB stick will only be accessible to machines with Linux operating systems.

In this example I have given the USB stick a Volume Label called “SECRETâ€.

Whenever you plug in this USB stick it will be mounted as “SECRET†by the operating system.

Next create a folder on “SECRETâ€. I called mine temp3.

Next mount and encrypt the temp3 folder by running the following command in Terminal. The path name should start with media/home directory name/usb volume name on a standard Ubuntu 18.04 install.

$ sudo mount -t ecryptfs /media/zephyr/SECRET/temp3 /media/zephyr/SECRET/temp3

The steps to automate are the same as described earlier on.

Note: Verify the volume name for the usb that you use in your scripts is correct and matches the one shown in Terminal when you type df .

In Conclusion

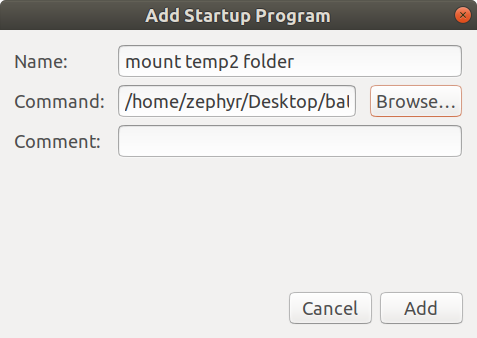
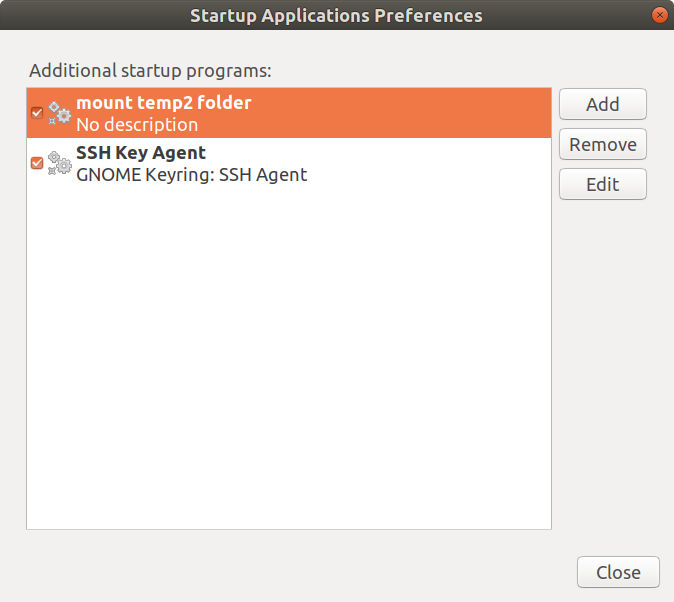
To further automate the mount process you could utilize the Startup Applications Preferences app

Start Program App to start ecryptfs .sh type executables at computer startup. Ubuntu 18.04
Start Program App

which comes pre-installed on Ubuntu 18.04 . This allows configuring applications to run automatically when logging in to your desktop. So just add the run_mount_temp2.sh example to the list of startup apps.

In the Command: field you need to enter bash U% followed by the path to your .sh executable.

bash %U /path/to/file/run_mount_temp2.sh

Alternatively you can create a .desktop file in /home/your home directory/.config/autostart . So for example mount_documents.desktop with the following code in it.

[Desktop Entry]
Type=Application
Exec= bash %U /home/zephyr/Desktop/batch/ecryptfs_batch/ecryptfs_mount_Documents.sh
Terminal=true
Hidden=false NoDisplay=false X-GNOME-Autostart-enabled=true Name[en_GB]=mount-documents.desktop Comment[en_GB]="mount encrypted Documents"

One quirk I noticed is that ecryptfs will allow you to carry on mounting your encrypted volume with an incorrect passphrase and proceed to create a new signature for it but you won’t be able to access your encrypted files and folders. Ecryptfs does warn you first that the passphrase you have entered maybe be incorrect and do you want to proceed with the mount. Best to abort if you are unsure about the passphrase you entered.

All in all , I think ecryptfs is a robust , fast and very flexible file encryption system.

Source Reference:

Moving a live WordPress site to a local LAMP Server

Linux, Apache, MySql, WordPress, Web Development, Algarve, Portugal
LAMP on Ubuntu 18.04

Audience: Ubuntu Desktop and Server users. Tested on 18.04

Steps to follow to setup a local development WordPress installation.

1) Copy your entire live WordPress directory to your local LAMP server.

Do this by means of FTP using and FTP Client such as Filezilla.

This should include your wp-admin, wp-includes , wp-admin and all the files in the root directory in which these reside. This is where the wp-config.php, wp-login.php, .htaccess files etc reside.

2) On your LAMP server these should be placed in the directory. It is advisable to create a folder under the html directory where these files will go if you are hosting more than one test site. e.g var/www/html/testsite

3) Backup the MySql database related to your WordPress live site. It is easiest to do this using PHPMyAdmin provided by your control panel of your hosting site. This is the only way have done it so far. Accept defaults and export the database. You will be given the option to save the file as a *.sql file.

Ubuntu 18.04, WordPress, Stack Exchange, Ask Ubuntu, Algarve, Portugal

4) On your LAMP server create a MySql database and database user. You can use PHPMyAdmin. However I have had problems, with PHPMyAdmin throwing up errors and not importing the database correctly or granting user privileges correctly. I have had to do it via command line like this. I strongly advise this method, as command line rules. 🙂

By command line.

Log into mysql as root

Create database

mysql> create database db_name;

Import the database:

mysql> use db_name;

mysql> source backup-file.sql;

Create a user and grant privileges

GRANT ALL PRIVILEGES ON mydb.sql TO myuser@localhost IDENTIFIED BY "mypassword";

5) Edit your WordPress wp-config.php ensuring that the database name, username and user password match the ones created.

6) Update your tables to ensure your links work but running the following 3 command line MySql queries on the following tables. You can do this by logging into mysql as root via command line.

UPDATE wp_options SET option_value = replace(option_value, 'https://www.example.com', 'https://localhost/test-site') WHERE option_name = 'home' OR option_name = 'siteurl';

UPDATE wp_posts SET post_content = replace(post_content, 'https://www.example.com', 'https://localhost/test-site');

UPDATE wp_postmeta SET meta_value = replace(meta_value,'https://www.example.com','https://localhost/test-site');

These queries will replace references to your live site’s URL from database with the localhost URL.

7) Lastly, an mostly importantly this pertains to the Ubuntu operating system environment. Apache here is installed differently from a native install for security reasons. In order to get your development WordPress running, you must do the following otherwise none of the symlinks ( symbolic links) to other pages on your site will work.

Note: nano is a text editor that’s pre-installed on Ubuntu

  1. In /etc/apache2/apache2.conf, edit AllowOverride None for /var/www/ to AllowOverride All
  2. To edit use

sudo nano /etc/apache2/apache2.conf

Press CTRL + W and search for “<Directory /var/www/>â€

Change here AllowOverride None to AllowOverride All

Save file and exit. (Press CTRL + X, press Y and then press ENTER)

  1. Type in the following command to enable mod_rewrite for .htaccess

sudo a2enmod rewrite

  1. Restart your apache server:

sudo service apache2 restart

Finally make sure you have a .htaccess file in the root directory where WordPress is installed.

It should contain code similar to this:

# BEGIN WordPress

<IfModule mod_rewrite.c>

RewriteEngine On

RewriteBase /your_directory/

RewriteRule ^index\.php$ - [L]

RewriteCond %{REQUEST_FILENAME} !-f

RewriteCond %{REQUEST_FILENAME} !-d

RewriteRule . /your_directory index.php [L]

</IfModule>

# END WordPress

That’s about it for now! Coming soon, a Control Panel App for a local LAMP install.

Sources:

Credits to: https://wordpress.stackexchange.com/users/84055/avinash (April,2020)

Credits to: https://www.wpbeginner.com, Editorial Staff at WPBeginner led by Syed Balkhi. (April,2020)

LAMP on Ubuntu 18.04

I took the leap and migrated to linux, ditching MS Windows 7 as my main operating system.

On the whole I am very pleased with Ubuntu 18.04.

I was running XAMPP on Windows 7 as test environment for hosting WordPress and PHP based applications.

So I needed to install a similar test environment on Ubuntu 18.04 desktop. In the Linux world this is LAMP. The components of LAMP are Linux, Apache Web Server, MySQL Server and PHP

Here is how to install LAMP on Ubuntu 18.04

Using command line via Terminal (press Control+Alt+T ) Terminal  Ubuntu 18.04

Install Mysql.

  • Ensure you have an internet connection then open Terminal.
  • Type sudo apt install mysql-server

Press Enter on the keyboard. This will install the Mysql Metapackage from the Debian repositories.

Test your Mysql server installation by typing mysql in the terminal window. You used be able to login with your Ubuntu user login password.

Install Apache 2

To install Apache you must install the Metapackage apache2 from the Debian repositories. This can by

  • Ensure you have an internet connection then open Terminal.
  • Type sudo apt install apache2

Install PHP

  • Ensure you have an internet connection then open Terminal.
  • sudo apt install php-pear php-fpm php-dev php-zip php-curl php-xmlrpc php-gd php-mysql php-mbstring
  • Your server should restart Apache automatically after the installation of both MySQL and PHP. If it doesn't, execute this command.

Check Apache

You should see the following page with a message saying that it work

Apache Web Server running

Check PHP

  • You can check your PHP by executing any PHP file from within /var/www/.
  • Alternatively you can execute the following command, which will make PHP run the code without the need for creating a file . $ php -r 'echo "Your PHP installation is working\n";'

Pat yourself on the back and take a break. Congratulations! You have just successfully installed a LAMP server on Apache.

As a reward install and play Chromium BSU.

  • Ensure you have an internet connection then open Terminal.
  • Type sudo apt install chromium-bsu

This should download and install this excellent arcade game which you can play for 5 minutes to have a break :). I tried downloading it from the Ubuntu Snap store but it didn’t install correctly from there. Chromium B.S.U Debian, Ubuntu 18.04

Preparing LAMP to run as a local WordPress and Web Hosting Test Environment.

Ubuntu installs Apache in modules and splits the configuration files which is different from the standard install.

The Mysql server installs with the Ubuntu user as root for authentication. WordPress and other applications use native mysql authentication.

Here is how to enable native root user authentication and change the mysql root user password.

  • Stop mysql:
  • $ sudo service mysql stop
  • (Be sure to stop the current server before performing the steps. Only one server can run at a time.)
  • $ sudo mkdir /var/run/mysqld; sudo chown mysql /var/run/mysqld
  • $ sudo mysqld_safe –skip-grant-tables&
You should see sonething like this if it runs successfully

[1] 1901

*@*-desktop:~$ 2020-04-29T20:36:42.126862Z mysqld_safe Logging to syslog.

2020-04-29T20:36:42.132327Z mysqld_safe Logging to '/var/log/mysql/error.log'.

  • 2020-04-29T20:36:42.197722Z mysqld_safe Starting mysqld daemon with databases from /var/lib/mysql
  • Next run $ sudo mysql --user=root mysql
  • This will log you in as the native mysql root user.

“Welcome to the MySQL monitor. Commands end with ; or \g.

Your MySQL connection id is 2

Server version: 5.7.29-0ubuntu0.18.04.1 (Ubuntu)..â€

and you should have the mysql prompt mysql>

  • to change the root pasword run

mysql> update user set authentication_string=PASSWORD('new_password') where user='root';

You should see

“Query OK, 1 row affected, 1 warning (0.03 sec)

Rows matched: 1 Changed: 1 Warnings: 1â€

  • To change the authentication plugin run

mysql> UPDATE user SET plugin='mysql_native_password';

You should see someething like

Query OK, 4 rows affected (0.00 sec)

Rows matched: 4 Changed: 4 Warnings: 0

  • Finally

mysql> FLUSH PRIVILEGES;

  • mysql> quit
  • stop and start the mysql server and test root login:

Stop mysql:

$ sudo service mysql stop

Start mysql (normal):

$ sudo service mysql start

Log in as root on localhost:

$ mysql -h localhost -u root -p 

That’s it for now! 

Sources:
Ask Ubuntu - software installation - mysql doesn't ask for root password when installing - Ask Ubuntu

Initial Server Setup with Ubuntu 18.04 | DigitalOcean

https://howtoubuntu.org/ ,How to Install LAMP on Ubuntu, April,2020