Prerequisites: A web server with SSL enabled. This method requires you to troubleshoot issues manually and edit WordPress files. However this is a permanent and more performance optimized solution. Performance gains are due to the fact the requested content does not have to be parsed by an additional plugin before it is displayed in the web page. In addition, it gives you more control over your website's security.
Steps
Log into the WordPress Dashboard.
Roll your mouse over Settings in the navigation menu, then click General.
In the WordPress Address (URL) field, enter your https address.
Enter your https address in the Site Address (URL) field.
Click the Save Changes button on the bottom of the screen.
Note: If you get an error to the effect of "Error connecting to web server" after savings the changes - the problem lies at the hosting provider's end . Some hosting providers use a different IP for hosting http: and https: and you will have to ensure the "A" record of your https domain is pointing to the correct one.
Next, you need to set up WordPress redirects from HTTP to HTTPS by adding the following code to your .htaccess file.
<IfModule mod_rewrite.c>
RewriteEngine On
RewriteCond %{HTTPS} off
RewriteRule ^(.*)$ https://%{HTTP_HOST}%{REQUEST_URI} [L,R=301]
</IfModule>
If you want to force SSL and HTTPS on your WordPress admin area or login pages, then you need to configure SSL in the wp-config.php file. Simply add the following code above the "That's all, stop editing!" line in your wp-config.php file:
define('FORCE_SSL_ADMIN', true);
This line allows WordPress to force SSL / HTTPs in WordPress admin area. Once you do this, your website is now fully setup to use SSL / HTTPS, but you will still encounter mixed content errors.
Mixed content errors are caused by sources (images, scripts, or stylesheets) that are still loading using the insecure HTTP protocol in the URLs. If that is the case, then you will not see a secure padlock icon in your website’s address bar. The majority of these incorrect URLs will be images, files, embeds, and other data stored in your WordPress database.
What you need to do is find all mentions of your old website URL in the database that starts with http and replace it with your new website URL that starts with https .
You can do this by installing and activating the “Better Search Replace” plugin. However, The free version of the "Better Search and Replace" plugin is not useful and even harmful as you cannot see what changes have been made. I used the “Search & Replace” plugin by Inpsyde GmbH. It is not supported anymore but works in WordPress 6.1.1
Websites are increasing under brute force hacking attempts and distributed denial of service attacks (DDOS) .
As a WordPress website administrator you can secure your site with a little bit of code if you feel confident enough. There are security plugins for WordPress should you wish to go down that route. I haven’t tried any of them and so cannot make a recommendation. The advantages of not using unnecessary plugins is increased code processing efficiency and hence better performance of a website. In addition there is the benefit from the security perspective of avoiding the possibility of getting stuck with outdated and unsupported plugins.
The three setups described below that I recommend are limiting the number of login attempts , denying xmlrpc requests and hiding your wp-admin.php page.
Ideally, you should not edit the functions.php file of the theme you are using. This is because changes will be lost when the theme is updated by the theme’s developers. Instead you should create a child theme and edit the functions.php of this.
To do this you can put the following code in your WordPress theme’s functions.php file.
// code to limit no. of login attempts - lock for 30 mins function check_attempted_login( $user, $username, $password ) { if ( get_transient( 'attempted_login' ) ) { $datas = get_transient( 'attempted_login' ); if ( $datas['tried'] >= 3 ) { $until = get_option( 'transient_timeout' . 'attempted_login' ); $time = time_to_go( $until ); return new WP_Error( 'too_many_tried', sprintf( __( 'ERROR: You have reached authentication limit, you will be able to try again in %1$s.' ) , $time ) ); } } return $user; } add_filter( 'authenticate', 'check_attempted_login', 30, 3 ); function login_failed( $username ) { if ( get_transient( 'attempted_login' ) ) { $datas = get_transient( 'attempted_login' ); $datas['tried']++; if ( $datas['tried'] <= 3 ) set_transient( 'attempted_login', $datas , 1800 ); } else { $datas = array( 'tried' => 1 ); set_transient( 'attempted_login', $datas , 1800 ); } } add_action( 'wp_login_failed', 'login_failed', 10, 1 ); function time_to_go($timestamp) { // converting the mysql timestamp to php time $periods = array( "second", "minute", "hour", "day", "week", "month", "year" ); $lengths = array( "60", "60", "24", "7", "4.35", "12" ); $current_timestamp = time(); $difference = abs($current_timestamp - $timestamp); for ($i = 0; $difference >= $lengths[$i] && $i < count($lengths) - 1; $i ++) { $difference /= $lengths[$i]; } $difference = round($difference); if (isset($difference)) { if ($difference != 1) $periods[$i] .= "s"; $output = "$difference $periods[$i]"; return $output; } } // end code to limit no. of login attempts - lock for 30 mins
You can change the lock out time by changing the third argument in the set_transient function which is currently set to 1800 seconds (30 mins.) This code will stop bots making brute force dictionary attacks on your username and password.
Denying xmlrpc Requests.
XMLrpc is a legacy protocol that used to be used for WordPress ping backs. It relies on transmission of the username and password. So an attacker can use bots to try and gain access to your website by guessing at passwords and usernames.
Another from of attack that uses XMLrpc is DDOS where thousands and even hundreds of thousands of XMLrpc requests are made to a website overwhelming it.
Please refer to the excellent document by SiteGround in the Credits to understand more about the XMLrpc and the vulnerability it poses to WordPress websites.
To disable XMLrpc insert the following code in the functions.php file of your theme.
Important! Make sure you use the correct type of single quotes.
add_filter( 'xmlrpc_enabled', '__return_false' ); will work okay while add_filter( ‘xmlrpc_enabled’, ‘__return_false’ ); will generate Warning: Use of undefined constant ‘xmlrpc_enabled’ - assumed '‘xmlrpc_enabled’' (this will throw an Error in a future version of PHP) in functions.php in a child theme.
You can also add the above code to the wp-config-php file. Add it after the require_once(ABSPATH . 'wp-settings.php'); line. There are a couple more ways to block XMLrpc requests. One being via the web server’s configuration file and the other via a plugin. Please refer to the SiteGround and the debugbar documents.
Hiding your wp-login.php file.
Some experts discourage doing it this as wp-login.php gets updated when the core WordPress version gets updated. If you remember this and update the changes manually this method is fine. It is also inadvisable if your website needs to provide login access to site members other than a handful of admin and authors.
Hiding your wp-login.php is very effective as bots target the wp-login.php either with password crackers or a DDOS attack once they know your website is powered by WordPress. Each wp-login request is costly as as information gets sent to and from the MySql database of the WordPress site.
The steps.
1) Backup your wp-login.php file. Then rename it on the web server. 2) Create a new .php file with a text editor like Notepad, Notepad++, Gedit (on Linux Ubuntu) etc. Name it whatever you want as long as you can remember it when you login e.g foxy-roxy.php 3) Copy all the contents from wp-login.php into foxy-roxy.php or whatever you named the new file. Use Crtl+Alt to select all and Paste. 4) Search and replace every occurrence of wp-login.php with foxy-roxy.php or whatever the file is called. Save the file. 5) The next step is to update the default login and logout URLs This is done via hooks in the theme’s functions.php . Add the following code to functions.php of the theme.
(remember to change ‘foxy-roxy’ to whatever your file is called. )
Add the following code to handle a safe logout and redirect to your home page.
// WP Redirect the user to the homepage after logout add_action('wp_logout','auto_redirect_after_logout'); function auto_redirect_after_logout(){ wp_safe_redirect( home_url() ); exit(); } //end WP Redirect the user to the homepage after logout
6) Next test your new login page URL. Website name/ foxy-roxy.php. Attempting to login with Website name/wp-login should produce a resource not found error.
7) Finally, delete the renamed wp-login.php from the web server.
Notes: Known vunerabilities with the above method. Due to the login code being hard coded in several places in WordPress , the name of your secret login page can get exposed by calls made wp-admin by an intelligent attacker rather than a bot. I think this can be taken care of by some sort of redirect but I haven't got the time to experiment.
One way to mitigate against this is to limit access to the login process to trusted IPs. This is done by editing the .htaccess file in the root WordPress installation directory and adding the following code. Remember to backup your .htaccess file before editing it.
#Limit access to website administration
<Limit GET POST PUT>
order deny,allow
deny from all
# admins IP
allow from xxx.xxx.xxx.xxx
</Limit>
where xxx.xxx.xxx.xxx is the IP number. You can add as many allow from IPs as you need or allow a whole Class C subnet with allow from xxx.xxx.xxx.0/24
In closing.
These three methods will certainly help secure your WordPress site and help counter the effects of a DDOS attack if you are subject to one.
Credits.
Phpot.com on Limiting the number of login attempts (09/12/2022):
eCryptfs is a POSIX-compliant enterprise
cryptographic "stacked" filesystem for
Linux. Please note that eCryptfs is not a partition/ disk encryption
subsystem like "Veracrypt".
eCryptfs is a stacked filesystem that can be mounted on any
directory and on top of the main file system.
Using eCryptfs, we can easily create an encrypted directory to store confidential data and mount it on any directory. Although it is good practice for the mount path to match the path of the underlying file system.
No separate partition or pre-allocated space is actually required. eCryptfs should work well on local filesystems such as EXT3, EXT4, XFS, JFS and ReiserFS etc.
eCryptfs also supports networked filesystems such as NFS, CIFS, Samba and WebDAV, but not does not have full functionality as it was designed to work with local filesystems.
It stores the cryptographic metadata in the headers of files, so the encrypted data can be easily moved between different users and even systems. eCryptfs has been included in Linux Kernel since version 2.6.19.
Installation
I have only tested it on Ubuntu 18.04 which runs on the
5.4.0-87-generic kernel obtained by running
$ uname -r
5.4.0-87-generic
To enable an utilize Ecryptfs install ecryptfs-utils
$ sudo apt install
ecryptfs-utils
How to use Ecryptfs
The method below explains how to encrypt a folder called temp2
located at /home/zephyr/temp2
Open terminal and run the following:
$ sudo mount -t ecryptfs
/home/zephyr/temp2 /home/zephyr/temp2
Passphrase: ← enter your passphrase
Select cipher:
1) aes: blocksize = 16; min keysize = 16; max keysize = 32
2) blowfish: blocksize = 8; min keysize = 16; max keysize = 56
3) des3_ede: blocksize = 8; min keysize = 24; max keysize = 24
4) twofish: blocksize = 16; min keysize = 16; max keysize = 32
5) cast6: blocksize = 16; min keysize = 16; max keysize = 32
6) cast5: blocksize = 8; min keysize = 5; max keysize = 16
Selection [aes]: 1 ← selected
Select key bytes:
1) 16
2) 32
3) 24
Selection [16]: 1 ← selected
Enable plaintext passthrough (y/n) [n]: n ←
selected
Enable filename encryption (y/n) [n]: n ←
selected
Attempting to mount with the following options:
ecryptfs_unlink_sigs
ecryptfs_key_bytes=16
ecryptfs_cipher=aes
ecryptfs_sig=015fa84ce5a1043d
Mounted eCryptfs
temp2 is now and encrypted folder. Any files and folders moved
into it or created in it, will be automatically encrypted.
It is very important to remember your passphrase to be able to access your eCryptfs encrypted files and folders. It is also advisable to make note of your encryption settings for future mounting/access of your encrypted file/directory. Choose a password of 14 characters long made up of 3 random words. This is easier to remember and still secure. You can add symbols and numbers to it increase the strength of the passphrase.
A signature file named "sig-cache.txt" will be created under "/root/.ecryptfs/" directory. This file is used to identify the mount passphrase in the kernel keyring. It is a read only file except for the root user. I suggest saving a copy with a .bak extension as the signature number for each encrypted and mounted folder. It is a good reference to have.
Accessing your encrypted data.
Each time you reboot
your system the encrypted volume will be dismounted and you will not
be able to access your encrypted data.
To access your data you have to
remount the encrypted volume with:
$
sudo mount -t ecryptfs /home/zephyr/temp2 /home/zephyr/temp2
After which Terminal pops up prompting you for your passphrase
type in your passphrase
The problem with this is that you have to enter all the encryption options each time.
Automating the mount process
My solution to this is make an executable .sh file with a text editor. I use the default, gnome, gedit text editor
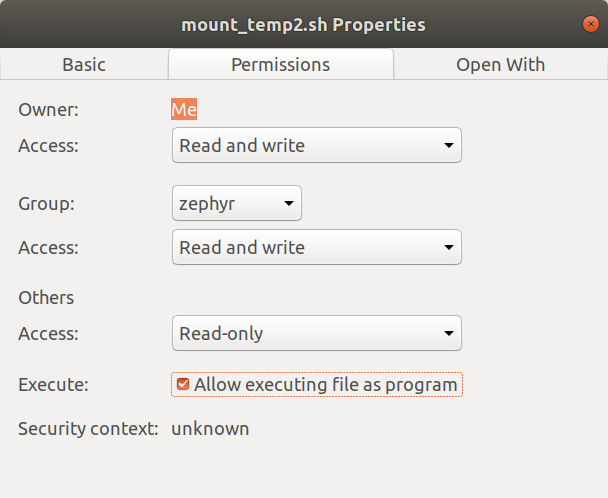
In this example, I have called it mount_temp2.sh
Paste the following code into it. Use whatever options you chose when you encrypted the file/folder.
#!/bin/bash $ sudo mount -t ecryptfs -o ecryptfs_cipher=aes,ecryptfs_key_bytes=16,ecryptfs_passthrough=no,ecryptfs_enable_filename_crypto=no /home/zephyr/temp2 /home/zephyr/temp2
Save mount_temp2.sh
Right click, on the file in File Manager, go to the Permissions tab and tick the box “Allow executing file as a program”
Next with your Text Editor, create a new executable file. Call it run_mount_temp2.sh for example. Paste the following code into it.
#!/bin/bash #start terminal and mount encrypted temp2 folder gnome- terminal -- sh -c './mount_temp2.sh'
Make
it executable as described
previously. Now when you
start your system, simply double click on
run_mount_temp2.sh
this it will call Terminal and prompt you to enter your passphrase. After entering the correct passphrase you will be granted full access to your encrypted folder and files within.
Automating the dismount process
You
can dismount (unmount) your encrypted folder at any time to make it
inaccessible. By default
to
unmount an encrypted drive manually,
open Terminal
an run
sudo umount /path/to encrypted/folder
so, in my test case it is
sudo umount /home/zephyr/temp2
To
Automate unmount/dismount:
Create
an executable file (refer to ‘Automating the mount process’ for
the steps) called
unmount_temp2.sh and in it enter the following code. Paths and folders should match your own.
Next
create the run file that will open Terminal and run the previous
created executable.
Create an executable file called run_unmount_temp2.sh
Enter the following code into it:
#!/bin/bash #start terminal and unmount encrypted temp2 folder gnome-terminal -- sh -c './unmount_temp2.sh'
Double clicking on run_unmount_temp2.sh will run Terminal and execute the command to unmount the encrypted folder
Notes on Automation
All the automation files should be in
the same folder/directory
The folder/directory containing the automation files should not be encrypted.
Creating an encrypted folder on a USB drive
On your Linux machine format a USB stick with ext4 file system. The USB stick will only be accessible to machines with Linux operating systems.
In this example I have given the USB
stick a Volume Label called “SECRET”.
Whenever you plug in this USB stick it
will be mounted as “SECRET” by the operating system.
Next create a folder on “SECRET”.
I called mine temp3.
Next mount and encrypt the temp3 folder by running the following command in Terminal. The path name should start with media/home directory name/usb volume name on a standard Ubuntu 18.04 install.
$ sudo mount -t ecryptfs /media/zephyr/SECRET/temp3 /media/zephyr/SECRET/temp3
The steps to automate are the same as described earlier on.
Note: Verify the volume name for the usb that you use in your scripts is correct and matches the one shown in Terminal when you type df .
In Conclusion
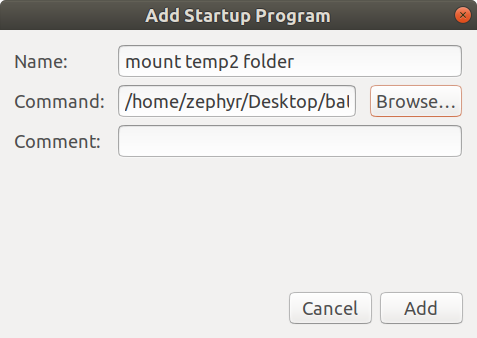
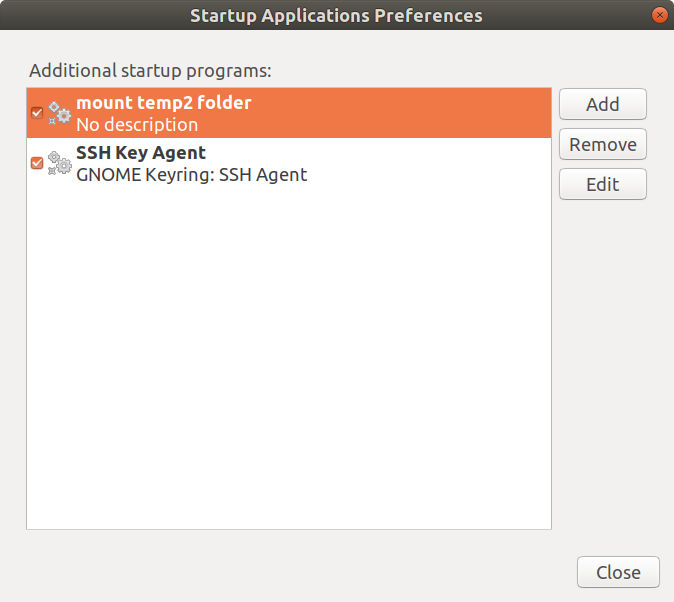
To further automate the mount process you could utilize the Startup Applications Preferences app
Start Program App
which comes pre-installed on Ubuntu 18.04 . This allows configuring applications to run automatically when logging in to your desktop. So just add the run_mount_temp2.sh example to the list of startup apps.
In the Command: field you need to enter bash U% followed by the path to your .sh executable.
bash %U /path/to/file/run_mount_temp2.sh
Alternatively you can create a .desktop file in /home/your home directory/.config/autostart . So for example mount_documents.desktop with the following code in it.
One quirk I noticed is that ecryptfs will allow you to carry on mounting your encrypted volume with an incorrect passphrase and proceed to create a new signature for it but you won’t be able to access your encrypted files and folders. Ecryptfs does warn you first that the passphrase you have entered maybe be incorrect and do you want to proceed with the mount. Best to abort if you are unsure about the passphrase you entered.
All in all , I think ecryptfs is a robust , fast and very flexible file encryption system.
This is a critical security issue allows a malicious entity to silently log onto your phone via bluetooth . “This vulnerability can lead to theft of personal data and could potentially be used to spread malware ” (TechSecurity, 2020). This vulnerability affects Android versions 4.2, 6.0.1, 7.0 and 8.0. If you are on a version that is older than 3 years you will not receive any security patches from Google.
How to reduce the risk of a BlueFrag vulnerability on older versions .
Since there aren’t any software patches what you can do is to keep your bluetooth connection turned off when not in use and not to make your phone is not discoverable via bluetooth.
The danger of running unsupported Android OS versions is high.
The current Android version is 10 but there are a lot of phones (millions!) running older versions which are no longer supported by Android and hence not patched for vulnerabilities. I have a phone with such an older android operating system v4.2 KitKat) and I am sure it has been hacked and the apps infected by malware. It has come to my attention many apps on it have every permission under the sun and even if you force stop them, they restart on reboot. BlueFrag is just one vulnerability. There are a host of malware apps that can be downloaded from the Google’s PlayStore including ones that can steal payments information and other personal information. To my mind Google takes a flexible view on security policy when it comes to safeguarding users’ personal data. Google have only committed to 3 year support plan for each version release. So you should consider this if you are in the market for a second hand phone.
What’s to be done if you are on a older OS?
Ditch phones with older versions. Personally I wouldn’t run anything older that v6.0 (Marshmellow) which has more strict settings to what permissions an app is granted. On v6.0 apps have to be granted permissions explicitly by the user to access sub systems on your phone. Of’course this requires knowledge by the user to know which permissions to allow or deny an app when prompted.
If you have the ability you can use ADB (Android Debug Bridge ) utility to remove bloatware apps from your phone and generally manage what is on your phone, in a better way.
More is less.
Be very careful with which apps you install. Just because an app (application) is available from Google Play for download does not mean that it is secure or that it will be secure in the future. Carefully check which permissions an app is requesting and has been granted. See this in your Settings -→ Apps.
I was looking for linux Web Analysis tools and came across GoAccess. I found it’s recommended on a cybercitibiz site (Gite,2021).
On Linux Ubuntu 18.04 you can install it from the debian
repository. Open Terminal and type
sudo install goaccess
This will run the install script and install goaccess on your system. To get help type
goaccess –help
To do something useful you need to point it at a web server log file. I am using a LAMP configuration for my test web server (Linux Apache MySql and PHP) . The log files here are located at /var/log/apache2/access.log where access.log is the name of the log file. If you have virtual hosts running you may have setup separate log files for each virtual host which is a good idea.
You can download remote web server log files to your local linux
and view them in the goacess application.
To view the log file in goaccess run
goaccess -f/path/to/logfile/access.log
example: goaccess -f/var/log/apache2/access.log
Note: If any of your directory names contains a space or spaces enclose it in quotes or goaccess will encounter a parsing error.
The following screen should come up.
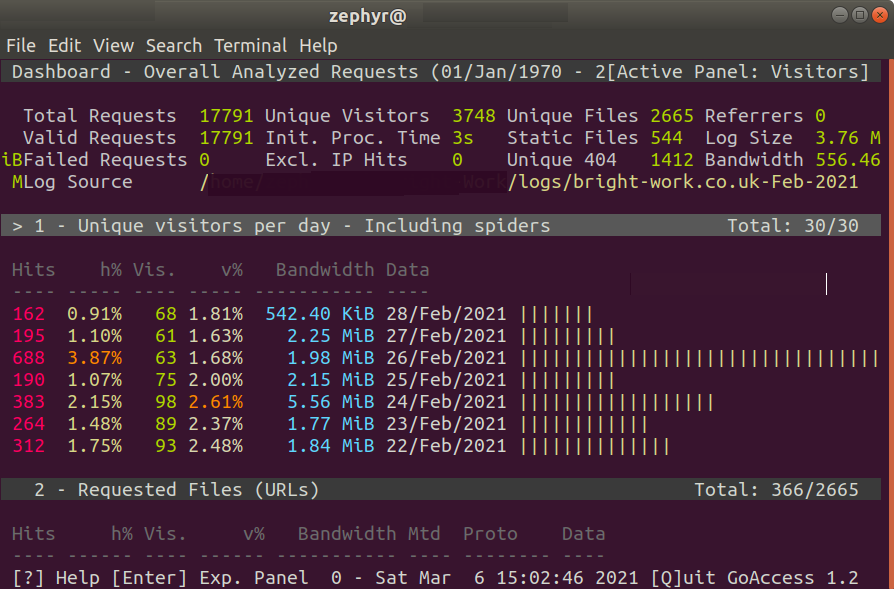
GoAccess initial selection screen- GoAccess is a light weight web traffic analysis Terminal tool for Linux
Pressing enter gives you the Analysis view shown below.
GoAccess Analysis of log file from a web server
I think it is an excellent tool for giving you some idea quickly, on what’s happening on your web site.
In my February log file snapshot, you can see that I had 3748 unique visitors and unfortunately no referrals (referrers). Referrals are when visitors come to your site through a link of your website on another site.
I think it is an really excellent tool! It’s small in size, just over 2Mb and easy on processor resources. And you don’t have to pass your or your client’s data to a third party like Google. Having mentioned Google , there is Google Analytics which is a full blown web analytics application. It is free. The down side is google have access all your web server traffic and activity.
There are Open Source Web Analytics alternatives which I am going to look into but for the moment I am happy with just GoAccess.
This was covered by myself in this previous article when I first ventured into the world of Linux and Ubuntu.
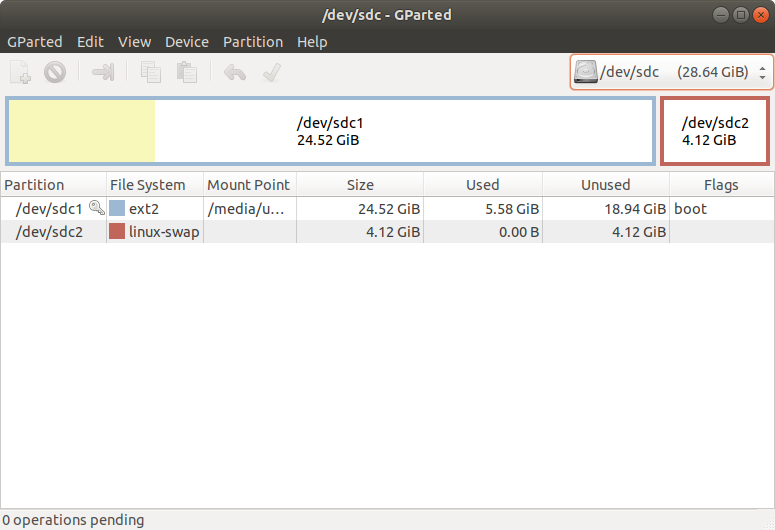
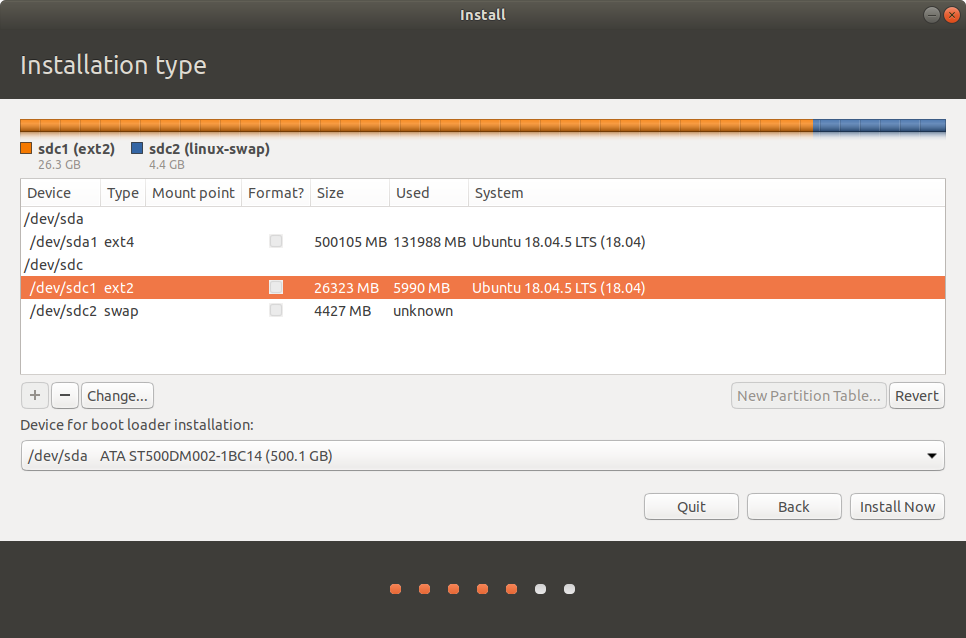
I have learned some new things now and this is a follow up to correct some inaccuracies. Firstly, you should not install Linux on any FAT file system including FAT32 as these file systems don't work correctly with linux file permissions.
Choose a partition size greater than 6GB preferably 10GB minimum for the primary partition which will contain the linux OS files and boot loader. Create a 4GB linux-swap partition as previously. Choose the ext4 journaling file system for the primary partition.
During installation I made a mistake and installed the ext2 file system which is a legacy linux file system and does not support journaling. A Journaling file system verifies the state of a file during the copy/move process by keeping logs. If a power outage occurred during the file copy process the system would know about it and inform the user that the file was not transferred/saved successfully. There is no such tracking with a non journaling file system and the corrupted file would be saved as a valid entry. I will have to see if I can convert from ext2 to ext4 without having to re-install.
The rest of the installation procedure for a portable Ubuntu linux 18.04 is still valid.
I decided to invest in a Bluetooth dongle to help me access the internet on my desktop etc via my smartphone. Why, I think is more secure in being less visible than a Wifi connection.
After having a look around I decided to go for the Plugable USB-bt4le from amazon. This is because it claimed be run on Linux. You can read the review here
And it did! However I had an issue when connecting on an unlocked smartphone that was on the Orange network. This forced me to dig into the world of Android development . It was a baptism of fire. 🙂 I spent and entire day and most of the night learning about Android’s adb (android debug bridge) and the android development environment.
Thanks to Canonical who maintain the software packages for Ubuntu, it is easy to install adb using the apt install adb command in Terminal.
After digging around
on the internet I found that tethering was set to use DUN and to
disable this you had to run
sudoadb shell in Terminal
followed by the statement below after you enter shell in
shell@E####:/ $ settings put global tether_dun_required 0
I think removing the APN for the DUN setting from the mobile phone carrier (on the Orange network in my case) also helped as it seemed to re-enable DUN on reboot.
shell@E####:/ $ settings delete global tether_dun_apn=[ApnSettingV3]Orange Internet,orange.fr,,,orange,orange,,,,,208,01,0,DUN,,,true,0,,,,,,,spn,Orange F
Then reboot.
This did not solve the tethering problem entirely although it prevented the DUN (Dail-up Network)lookup on trying to connect.
What really got it working - Solution to Bluetooth tethering the Smartphone running Android 6.0.1
On your Android Smartphone Go to Settings
Turn on Bluetooth first (ensure you also have an internet connection although this can be done later ). Then
Settings → More → Tethering and Portable Hotspot
then Enable
Bluetooth tethering.
And this should
work! Unfortunately it seems you have to do this each time you turn
Bluetooth on.
I uninstalled the older version of phpMyAdmin via Terminal and running :
sudo apt remove phpmyadmin
These were originally
installed from the Debian repository using Terminal and command line
when I setup LAMP .
Do not use the autoremove command if you want the current version of php left in place. I also left the old phpMyAdmin database in place. Because I was not sure if it was needed by the new version.
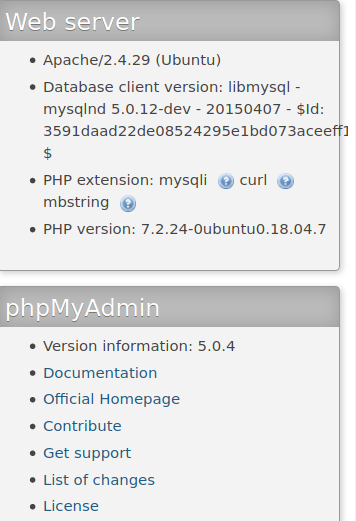
My current php and phpMYAdmin versions are as shown in the image below
You can refer to this article here. phpMyAdmin never worked properly. When accessing tables in databases I got the following type error.
Warning in ./libraries/sql.lib.php#613
count(): Parameter must be an array or an object that implements Countable etc….
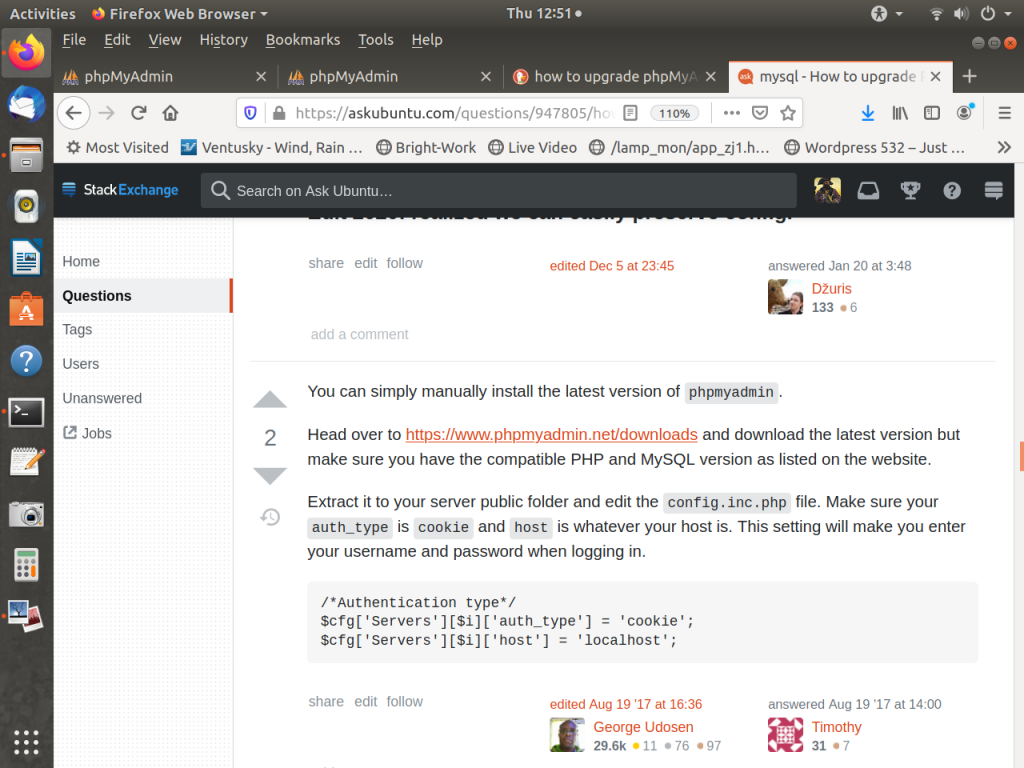
After looking at various articles the best solution I think is the one I found at AskUbuntu.com . See the image below.
It is simple and very effective. And exemplifies the portability of phpMyAdmin. The other methods of removing the installed version of phpMyAdmin and installing a newer version look painful and are not guaranteed as the Debian repository may not have the latest version or version compatible with your current Php version.
Method:
Go to the phpMyAdmin website. Download the latest version in zip format (5.0.4 at the time of writing). Copy the hash number as well. This will enable you to verify the integrity of the downloaded file.
Verify the hash number. To do this, open Terminal, supply the path where the zip file has been downloaded and type sha256sumfilename.zip . Verify the hash number is the same as that supplied by the phpMyAdmin download site. See image below.
Unzip the file.
Copy the unzipped folder and all it’s contents to your public folder. On Ubuntu 18.04 running Apache 2.4.29 this is in ‘/var/html’ . You can renamed to folder to something shorter if you like.
Make a copy of config.sample.inc.php and rename it to config.inc.php.
Edit config.inc.php
Make sure you have the authentication part setup correctly as follows to use a cookie and your web server is correctly specified in host.
/*
Authentication type */
$cfg['Servers'][$i]['auth_type']
= 'cookie';
/*
Server parameters */
$cfg['Servers'][$i]['host']
= 'localhost';
$cfg['Servers'][$i]['compress']
= false;
$cfg['Servers'][$i]['AllowNoPassword']
= false;
Save config.inc.php
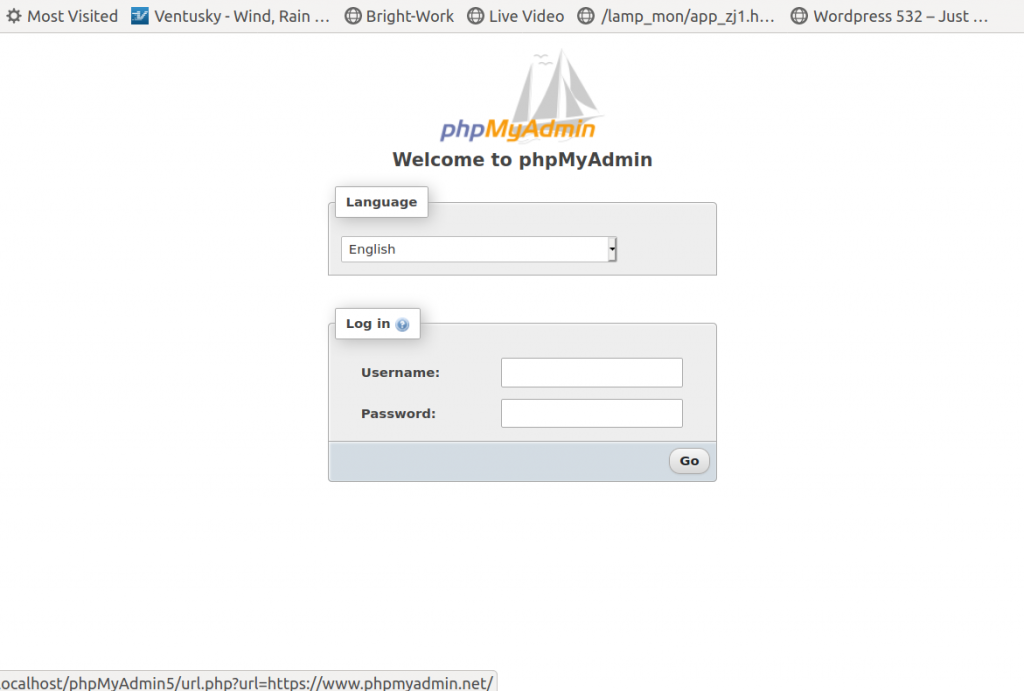
Launch phpMyAdmin by accessing the phpMyAdmin hosted folder.
Audience: Ubuntu Desktop and Server users. Tested on 18.04
Steps to follow to setup a local development WordPress installation.
1) Copy your entire
live WordPress directory to your local LAMP server.
Do this by means of
FTP using and FTP Client such as Filezilla.
This should include your wp-admin, wp-includes , wp-admin and all the files in the root directory in which these reside. This is where the wp-config.php, wp-login.php, .htaccess files etc reside.
2) On your LAMP
server these should be placed in the
directory. It is advisable to create a folder under the html
directory where these files will go if you are hosting more than one
test site. e.g var/www/html/testsite
3) Backup the MySql database related to your WordPress live site. It is easiest to do this using PHPMyAdmin provided by your control panel of your hosting site. This is the only way have done it so far. Accept defaults and export the database. You will be given the option to save the file as a *.sql file.
4) On your LAMP server create a MySql database and database user. You can use PHPMyAdmin. However I have had problems, with PHPMyAdmin throwing up errors and not importing the database correctly or granting user privileges correctly. I have had to do it via command line like this. I strongly advise this method, as command line rules. 🙂
By
command line.
Log into mysql as root
Create
database
mysql>
create database db_name;
Import
the database:
mysql>
use db_name;
mysql> source backup-file.sql;
Create a user and grant privileges
GRANT ALL PRIVILEGES ON mydb.sql TO myuser@localhost IDENTIFIED BY "mypassword";
5)
Edit
your WordPress wp-config.php ensuring that the database name,
username and user password match the ones created.
6) Update your tables to ensure your links work but running the following 3 command line MySql queries on the following tables. You can do this by logging into mysql as root via command line.
UPDATE
wp_options SET option_value = replace(option_value,
'https://www.example.com', 'https://localhost/test-site') WHERE
option_name = 'home'
OR
option_name = 'siteurl';
UPDATE
wp_posts SET post_content = replace(post_content,
'https://www.example.com', 'https://localhost/test-site');
UPDATE
wp_postmeta SET meta_value =
replace(meta_value,'https://www.example.com','https://localhost/test-site');
These
queries
will replace references
to your live site’s URL from database with the localhost URL.
7) Lastly, an mostly importantly this pertains to the Ubuntu operating system environment. Apache here is installed differently from a native install for security reasons. In order to get your development WordPress running, you must do the following otherwise none of the symlinks ( symbolic links) to other pages on your site will work.
Note: nano is a text editor that’s pre-installed on Ubuntu
In /etc/apache2/apache2.conf, edit AllowOverride
None for /var/www/ to AllowOverride All
To edit use
sudo nano /etc/apache2/apache2.conf
Press CTRL + W and search for “<Directory /var/www/>”
Change here AllowOverride None to AllowOverride All
Save file and exit. (Press CTRL + X, press Y and then press
ENTER)
Type in the following command to enable mod_rewrite for
.htaccess
sudo a2enmod rewrite
Restart your apache server:
sudo service apache2 restart
Finally make sure you have a .htaccess file in the root
directory where WordPress is installed.
It should contain code similar to this:
# BEGIN WordPress
<IfModule
mod_rewrite.c>
RewriteEngine On
RewriteBase
/your_directory/
RewriteRule ^index\.php$
- [L]
RewriteCond
%{REQUEST_FILENAME} !-f
RewriteCond
%{REQUEST_FILENAME} !-d
RewriteRule .
/your_directory index.php [L]
</IfModule>
# END WordPress
That’s about it for now! Coming soon, a Control Panel App for a local LAMP install.
I took the leap and
migrated to linux, ditching MS Windows 7 as my main operating system.
On the whole I am
very pleased with Ubuntu 18.04.
I was running XAMPP
on Windows 7 as test environment for hosting WordPress and PHP based
applications.
So I needed to install a similar test environment on Ubuntu 18.04 desktop. In the Linux world this is LAMP. The components of LAMP are Linux, Apache Web Server, MySQL Server and PHP
Here is how to install LAMP on Ubuntu 18.04
Using command line via Terminal (press Control+Alt+T )
Install
Mysql.
Ensure you have an internet connection then open Terminal.
Type
sudo apt install
mysql-server
Press
Enter on the keyboard. This will install the Mysql Metapackage
from
the Debian repositories.
Test your Mysql server installation by typing mysql in the terminal window. You used be able to login with your Ubuntu user login password.
Install
Apache 2
To
install Apache you must install the Metapackage apache2 from
the Debian repositories.
This can by
Ensure
you have an internet connection then
open Terminal.
Type
sudo apt install apache2
Install
PHP
Ensure
you have an internet connection then
open Terminal.
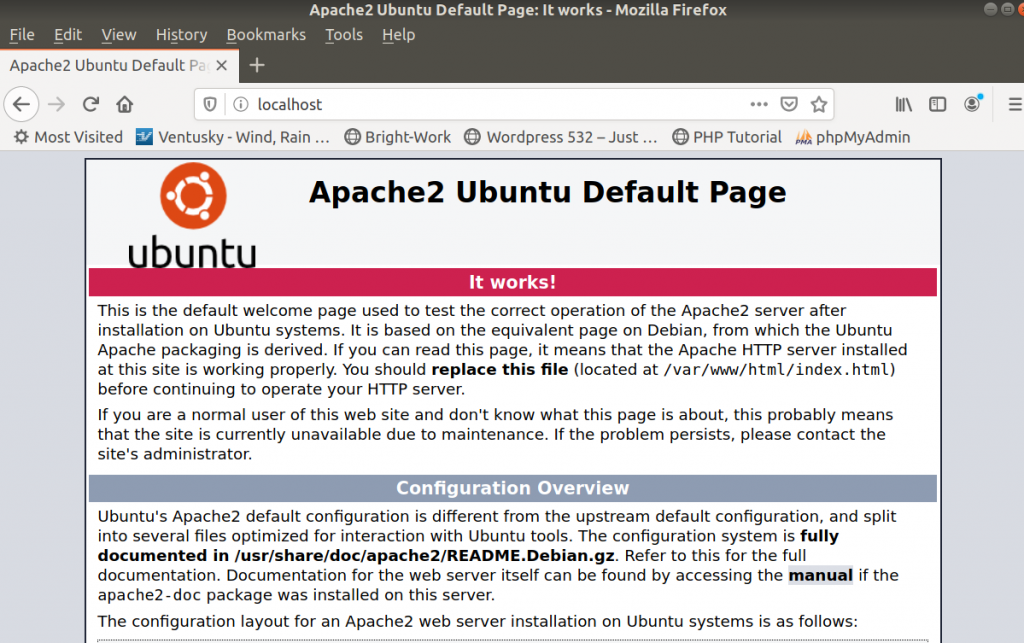
You should see the following page with a message saying that it work
Apache Web Server running
Check
PHP
You
can check your PHP by executing any PHP file from within /var/www/.
Alternatively
you can execute the following command, which will make PHP run the
code without the need for creating a file .
$
php -r 'echo "Your
PHP installation is working\n";'
Pat
yourself on the back and take a break. Congratulations! You have just
successfully installed a LAMP server on Apache.
As a reward install and play Chromium BSU.
Ensure
you have an internet connection then open Terminal.
Type
sudo apt install chromium-bsu
This should download and install this excellent arcade game which you can play for 5 minutes to have a break :). I tried downloading it from the Ubuntu Snap store but it didn’t install correctly from there.
Preparing
LAMP to run as a local WordPress and Web Hosting Test Environment.
Ubuntu
installs Apache in modules and splits the configuration files which
is different from the standard install.
The
Mysql server installs with the Ubuntu user as root for
authentication. WordPress and other applications use native mysql
authentication.
Here ishow to enable native root user authenticationand change the mysql root user password.
Stop mysql:
$ sudo service mysql stop
(Be sure
to stop the current server before
performing the steps. Only one server can run at a time.)
$ sudo mkdir /var/run/mysqld; sudo chown mysql /var/run/mysqld
$sudo mysqld_safe –skip-grant-tables&
You should see sonething like this if it runs successfully
[1] 1901
*@*-desktop:~$
2020-04-29T20:36:42.126862Z mysqld_safe Logging to syslog.
2020-04-29T20:36:42.132327Z
mysqld_safe Logging to '/var/log/mysql/error.log'.
2020-04-29T20:36:42.197722Z
	mysqld_safe Starting mysqld daemon with databases from
	/var/lib/mysql
Next
	run
$
sudo
	mysql --user=root mysql
This
	will log you in as the native mysql root user.
“Welcome to the MySQL
monitor. Commands end with ; or \g.
Your MySQL connection id is 2
Server version:
5.7.29-0ubuntu0.18.04.1 (Ubuntu)..”
and
you should have the mysql prompt mysql>
to
	change the root pasword run
mysql>
update
user set authentication_string=PASSWORD('new_password')
where user='root';
You
should see
“Query
OK, 1 row affected, 1 warning (0.03 sec)
Rows
matched: 1  Changed: 1  Warnings: 1”
To change the authentication
plugin run
mysql>
UPDATE user SET
plugin='mysql_native_password';
You
should see someething like
Query OK, 4 rows affected
(0.00 sec)
	Rows
matched: 4  Changed: 4  Warnings: 0
Finally
mysql>
FLUSH
PRIVILEGES;
mysql>
quit
stop
	and start the mysql server and test root login:
 English
  Portuguese